Skip to content
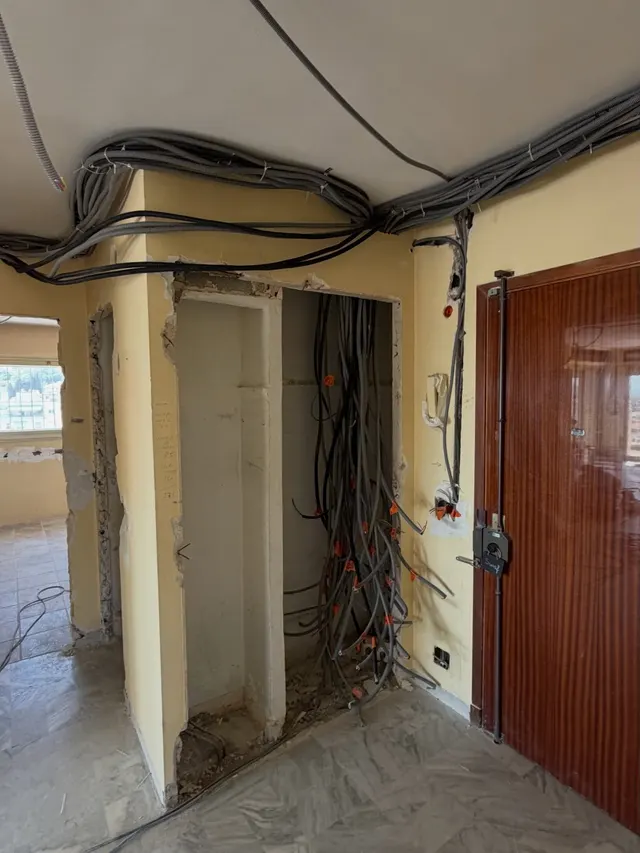
Electrical cables run across the ceiling of a flat during a complete rewire

Rewiring a home

Twelve steps, several of which the standard will not let you sign off yourself.

You
12 – 23 days
Budget
1 200 – 3 000 €
Steps
12

Times and budgets are indicative, for a confident DIYer, surprises excluded.

Rewiring a home is two jobs in one. The first is hard graft: setting out, chasing, drilling, pulling cables, filling in. The second is design work governed by NF C 15-100 (the French electrical standard), which sets the circuits, the cable sizes, the protective devices and the earthing.

The first can be learned. The second gets checked: a fully rebuilt installation is meant to be inspected, and switching it on goes through a certificate of conformity endorsed by Consuel (the electrical conformity body) — which is not issued on the judgement of whoever pulled the cables.

Finally, the electrics govern everybody else's calendar: chases after the demolition and before the skimming, cables before the partitions, accessories after the painting. One forgotten point means opening a wall that is already painted.

The steps

1
/12

Assess the existing installation

Estimated time 0.5 – 1 days

Open the consumer unit, count the circuits, look for the earth, spot the cloth-insulated wires, the sockets with no earth pin and the connector blocks sitting loose in the boxes. That will tell you whether you have a consumer unit to change or an installation to rebuild.

Tools

  • multimeter
  • voltage-testing screwdriver
  • head torch

What goes wrongConcluding "it's fine, there's an RCD" without checking the earth. An RCD with no effective earth electrode does not protect the way you think.

2
/12

Draw the scheme before you touch a wall

Estimated time 0.5 – 1 days

On a plan, place every socket, every light point, every switch, then group them into circuits. The standard sets a maximum number of points per circuit and dedicated circuits for the big appliances. The only free step, and the one that decides everything else.

Tools

  • dimensioned plan of the home
  • a guide to NF C 15-100
  • a spreadsheet for the load calculation

What goes wrongDrawing the sockets without thinking about the furniture. Six sockets behind a bookcase and none near the sofa: compliant and unusable.

3
/12

Isolate, lock off, verify

Estimated time 0.5 days

Switch off at the main incoming breaker, label the isolation, and verify there is no voltage on every conductor: a home under renovation always contains one circuit everyone thought was dead. Plan a separate, protected site supply.

Tools

  • voltage detector
  • lock-off device
  • extension lead on an RCD

What goes wrongWorking on a circuit fed from the landing or from another flat. The breaker is open and the wires are live all the same.

4
/12

Set out and cut the chases

Estimated time 2 – 4 days

Snap the routes with a chalk line, vertical and horizontal, never diagonal, so that the next person to drill knows where the cables are. Then the wall chaser and the breaker — a vacuum connected to the machine is what makes the day survivable.

Tools

  • twin-blade wall chaser (hired)
  • breaker drill
  • class M vacuum
  • FFP3 mask and ear defenders

What goes wrongChasing a load-bearing wall over its full height. You weaken the structure, and that can be laid at your door.

Vertical chases in a wall with cables pulled through to two back boxes, tools on the floor
5
/12

Fit the boxes and the conduit

Estimated time 1.5 – 3 days

Boxes set in at the right depth and the right height: the standard fixes heights for sockets, switches and outlet points. ICTA conduit goes in with a draw wire already inside: nobody re-pulls a buried conduit without one.

Tools

  • diamond hole saw
  • pre-wired ICTA conduit
  • bonding plaster
  • laser level

What goes wrongSetting the boxes before you know the thickness of the finish to come. After the tiling or the wall lining they sit too deep and the accessories no longer hold.

Back boxes and cable runs bedded in plaster in a small room under works
6
/12

Pull the cables

Estimated time 2 – 4 days

Each circuit its own cable size: the standard pairs a conductor size and a breaker rating with each use. Lighting, sockets, hob, oven and washing machine share neither cable nor breaker. Label every cable at both ends as you pull it — afterwards you will not know.

Tools

  • nylon draw tape
  • cables in the right sizes
  • labels
  • cable pulling lubricant

What goes wrongUndersizing the cable on a high-load circuit. The breaker may not trip while the conductor heats up inside the wall.

Cables pulled across a plasterboard lining with the switch positions marked in pencil
7
/12

Fit and wire the consumer unit

Estimated time 1 – 2 days

The consumer unit goes into the services enclosure, with its supply, its RCDs, its breakers and spare ways for the future. Every way is labelled, combed up cleanly, and recorded on a schedule fixed behind the door.

Tools

  • consumer unit and busbars
  • insulated screwdrivers
  • crimping pliers
  • labels

What goes wrongA consumer unit wired with no schedule and no labels. Ten years later, every visit starts with an hour of detective work.

8
/12

Earthing and equipotential bonding

Estimated time 0.5 – 1.5 days

The earth electrode, the main protective conductor and the supplementary bonding in the bathroom are not optional extras: they are what makes the RCDs work. The resistance of the earth electrode is measured, not assumed.

Tools

  • earth rod and test link
  • green and yellow conductor
  • earth resistance tester (hired)

What goes wrongLeaving out the supplementary bonding in the bathroom. Everything works, until the day a fault puts a metal part live.

9
/12

Fill the chases

Estimated time 1 – 2 days

Bonding plaster in two passes, flush with the wall, with no hollows and no humps: a proud repair shows through the paint. Wait for it to dry right through before skimming over it.

Tools

  • bonding plaster
  • filling knives
  • dusting brush

What goes wrongFilling a chase without dusting it out first. The plaster does not grip and the crack comes through the finished paint.

Vertical chases filled with plaster, back boxes waiting for their accessories
10
/12

Fit the accessories

Estimated time 1 – 2 days

Only after the painting: sockets, switches, light points, faceplates. Each connection is simple, but there are several dozen of them and they all have to be tightened properly. Align them and set them level: this is what people see every day.

Tools

  • insulated screwdrivers
  • wire strippers
  • short spirit level
  • accessories and faceplates

What goes wrongA conductor left loose in a terminal. It heats for months before the terminal blackens: a classic cause of electrical fire.

White switch fitted and aligned on a painted wall in a finished home
11
/12

Test before switching back on

Estimated time 0.5 – 1 days

Earth continuity, insulation resistance on every circuit, RCD trip times, terminal tightness. These measurements need an installation tester, not a multimeter. You energise circuit by circuit, never everything at once.

Tools

  • installation tester (hired)
  • RCD tester
  • test result sheet

What goes wrongSwitching everything back on in one go. One insulation fault trips the lot, and then you have to find which one.

12
/12

Certificate of conformity and energisation

Estimated time 0.5 – 1 days

For a new connection, and after a complete renovation in which the meter was removed or the supply altered, the network operator requires a certificate of conformity endorsed by Consuel before energising. In other cases it is not systematically required: check with Consuel and with your supplier.

Tools

  • the installation file
  • the consumer unit schedule
  • test records

What goes wrongDiscovering the certificate requirement after the walls are closed. You then have to open chases that are skimmed and painted.

Do it yourself, or have it done

  • You can do this
  • Better left to a pro
  • Regulated by law
  • You can do thisAssessing what is there and drawing the schemeNo risk, and it saves the most: a clear plan shortens everything that follows.
  • You can do thisChases, drilling and filling inHard work and dust, not a regulated skill — except on a load-bearing wall.
  • You can do thisRunning the conduit and pulling the cablesLong and methodical: what matters is pre-wired conduit and labelling every cable.
  • Regulated by lawDesigning the circuits, cable sizes and protectionNF C 15-100 imposes dedicated circuits, sizes and ratings: written rules, not custom.
  • Regulated by lawFitting and wiring the consumer unitThe protective heart of the whole home, and the first thing any inspection looks at.
  • Regulated by lawEarth electrode and equipotential bondingWithout an effective, measured earth, the RCDs do not do their job.
  • Regulated by lawBathroom circuitsThe standard divides the room into zones that allow or forbid each type of equipment.
  • Regulated by lawWork upstream of the main incoming breakerThe part before your main breaker belongs to the network operator: it stays live.
  • You can do thisReplacing an existing socket or switchProvided you isolate the circuit, verify there is no voltage and keep the earth connected.
  • Better left to a proTesting before switching back onInsulation, continuity and trip times are measured with an installation tester, not a multimeter.

You or Zenith

You

  • 12 to 23 days of actual work for a flat, excluding making good the walls
  • €1,200 to €3,000 of materials, cable, consumer unit and tool hire (indicative)
  • Stages that the standard and the network operator will not let you sign off
  • No conformity document to produce in case of an inspection, a claim or a sale
  • One trade to slot between demolition and skimming, with no margin for error

Zenith

  • Free quote within 48 h
  • One contact from floor to ceiling
  • Price agreed before work starts

Price range

  • Loading…
  • Loading…

Range excl. VAT — VAT varies with the type of work

Indicative range, not contractually binding.

This estimate is not a quote: the final price is set with you, after a site visit.

Common questions

Can you rewire your own home?

Nothing stops a private owner working in their own home, and the physical part — chases, conduit, cable pulling, filling in — is within reach. But the design answers to NF C 15-100, the measurements need a specific instrument, and energising goes through a certificate of conformity.

Is a Consuel certificate compulsory?

It is required by the network operator for any new connection, and after a complete renovation where the meter has been removed or the supply altered. Otherwise it is not systematically asked for: check with Consuel and with your supplier.

How long does it take to rewire a flat?

Twelve to twenty-three days of actual work on your own for an average home, excluding skimming and painting. This trade slots between the demolition and the finishes: you cannot catch it up at the end of the job.

Rewire everything, or just change the consumer unit?

Replacing the consumer unit alone makes sense if the existing circuits are sound and connected to an effective earth. If you find conductors with no earth, cloth-insulated wires or joints buried in the walls, a new consumer unit will only protect an installation that stays dangerous. The assessment is what decides.

What is the risk with a non-compliant installation?

A fire or an electric shock leads to an expert's report, and the expert traces it back to the installation. An installation rebuilt with no conformity, no measurements and no paperwork exposes whoever carried it out.